Blueberry Cobbler


This post was originally published on August 13, 2010 (yep, almost 4 years ago!) on Cooking for Seven. I was ever so proud of my photos.  

I made this again recently and remembered why I liked it so much. I used sprouted flour for the topping this time around and it was still yummy. And I melted the butter instead of cutting it in - I'm lazy like that. I also baked it in a deep dish pie pan, which was pretty. 
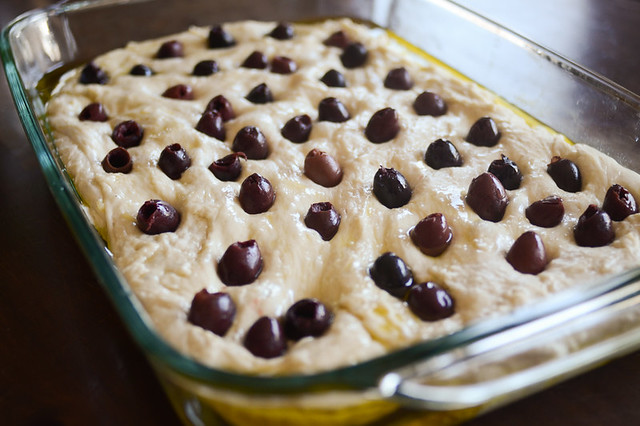
Have I told you about this cobbler? It is wonderful. Easy, fast, delicious. My dad likes it better than blueberry pie. The first time we made it he said, “You need to USE this recipe.” And so we have.

The construction of the topping was new to me: Cut the butter into the dry ingredients, then add boiling water. The result is a tender, tasty topping. And it’s so much easier than pie dough.

Notes: The original recipe calls for blackberries. Blueberries make a wonderful substitute, but I like to add more than the recipe calls for. Of course I substituted whole wheat for AP flour and maple sugar for granulated.


Blueberry Cobbler
Adapted from Buns in My Oven
Ingredients:
For the dough:
  • 1 1/2 (6 ounces) whole wheat pastry flour
  • 1/2 cup maple sugar, demerara, rapadura, or sucanat
  • 1  1/2 teaspoons baking powder
  • 1/2 teaspoon salt
  • 1 teaspoon cinnamon
  • 9 tablespoons cold butter, cut into pieces
  • 1/3 cup boiling water
For the filling:
  • 2 tablespoons corn starch
  • 1/4 cup cold water
  • 1 tablespoon lemon juice
  • 4-6 cups fresh blueberries
  • 1/2 cup maple sugar, demerara, rapadura, or sucanat
Directions:
1) Preheat oven to 400 degrees.
2) For the dough: Mix the flour, sweetener of choice, baking powder, salt, and cinnamon in a large mixing bowl. Cut in the butter until you have a coarse, crumbly mixture. Pour in the boiling water and stir together until all of the dough is wet. Set aside.
3) For the berries: Dissolve the cornstarch in the cold water in a medium bowl. Add the lemon juice, berries, and sweetener of choice. Mix together well.
4) Transfer berries to a 10 inch cast iron pan. Heat mixture over medium heat until boiling, stirring frequently. Remove from heat.
5) Drop spoonfuls of dough over the berry mixture and place the cast iron pan on a foil lined cookie sheet and place in the oven. Bake for 20-25 minutes, until the dough is golden brown and the berries are thick and bubbly.
Note: If you don’t have a cast iron pan, you can bring the berries to a boil in a sauce pan and bake in a 9×9 baking dish.
Makes approximately 6-8 servings.

Roasted Garlic and Olive Focaccia


Roasted Garlic and Olive Focaccia

This Focaccia was really good, guys. Soft, olive oil-saturated dough with a hint of roasted garlic, topped with Kalamata olives and coarse salt. Mmhmm. 

You can check out the recipe and my step-by-step instructions over on the Tasty Kitchen Blog HERE.

Have a lovely day!
Erica


One


Top Recipes from Buttered Side Up

Buttered Side Up is one year old!


Here are some of my favorite recipes from year one:


In celebration, I'm giving away these awesome items from West Elm:
West Elm Giveaway
Herb Tea Towel | Your choice of two Weck jars | Your choice of one enamel mug


Here's how you can enter to win:
Leave a comment on this post answering this question: Which is your favorite Buttered Side Up post so far?

Rules:
  • Only one comment per person.
  • You MUST leave a way for me to contact you (email, Twitter, blog, etc.)
  • Only US residents, please.
  • Giveaway will end on Monday, June 30 at 11:59 PM. After that time no comments will be considered for giveaway.
  • Using random.org, I will choose one winner. If the winner does not respond to my message within 48 hours I will select a new winner. 

Good luck!


Homemade Baked Tortilla Chips


Homemade Tortilla Chips

Tortilla chips are one of those things that's really hard to find a truly healthy version of in stores. Even if they're made with organic corn, they're nearly always made with a polyunsaturated fat. What's a chip lovin' girl to do? Deep fried chips are delicious, but it's way too much work to heat up the oil and grease up your kitchen on a regular basis. 

My grandma is a big fan of The Food Network. A while back when I was visiting her we sat down to watch some cooking shows. Giada was on, and she made baked tortilla chips. It looked ridiculously easy. I tried it, and it was (ridiculously easy).


Here's the super simple process:

Homemade Tortilla Chips
Everything you'll need: Tortillas, coconut oil and salt. That's it!


Homemade Tortilla Chips
Brush both sides of the tortillas evenly with the oil.


Homemade Tortilla Chips
Cut into triangles.


Homemade Tortilla Chips
Arrange on a baking sheet.


Homemade Tortilla Chips
Bake until golden and crispy. And you're done!


Homemade Tortilla Chips
These chips are (of course) best eaten fresh, so I like to make them in small batches.


Homemade Baked Tortilla Chips
recipe from Giada | makes about 2 servings

Ingredients:


Directions:
Preheat your oven to 350 F (175 C) 

Brush each side of the tortillas evenly with the melted coconut oil. Cut into triangles with a big knife. Arrange on a baking sheet and sprinkle with salt.

Bake in preheated oven until golden and crispy, about 15-17 minutes (you might want to start checking the tortillas at the 12 minute mark). Cool completely and store in an airtight container.


Homemade Tortilla Chips


Note: Some links are affiliate. All opinions are my own and I would never share a product with you guys that I haven't already tested unless otherwise stated.

Maple Sticky Buns


I originally published this post three years ago on June 8, 2011, three days before our wedding. Wow. All the feels.


Maple Pecan Sticky Buns
These last few days of being single (yay!), I have been reflecting a bit on my life at home. Until now, it hasn’t really hit me that I’m leaving – entering a wonderful, new life with my husband-to-be. Apparently it hit my mom as well…we had a crying-and-hugging-fest today.
Cooking for Seven has been such a great creative outlet for me over the years (Did I really start this blog almost three years ago? How time flies…), and a bit of a challenge. Thank you all for your encouragement, tips, praise, and corrections (thank you for being honest!). It is my intention to continue sharing recipes with you after I’m married…my future mother-in-law instructs me to continue “cooking for seven” — my fiance eats a lot! :)
But I must say goodbye for a little while as I am getting married this weekend! Until we meet again, here is a scrumptious recipe for Maple Pecan Sticky Buns.


Maple Pecan Sticky Buns
Ingredients:
For the dough:
  • 2 1/2 cups all-purpose flour
  • 1 cup whole wheat flour
  • 2 teaspoon instant yeast
  • 3 tablespoons maple sugar, granulated sugar, or sweetener of choice
  • 1 1/4 teaspoons salt
  • 1 – 1 1/2 cup milk, scalded and cooled
  • 1 large egg, lightly beaten
  • 1 teaspoon vanilla extract
  • 2 tablespoons soft butter
For the filling:
  • 3/4 cups pecans, finely chopped
  • 1/2 cup (packed) golden brown sugar
  • 2 teaspoons ground cinnamon
  • soft butter for spreading on dough
For the syrup:
  • 1/2 cup pure maple syrup
  • 4 1/2 tablespoons (1 stick plus 1 tablespoon) unsalted butter
  • 1/2 cup (packed) golden brown sugar
  • 1/2 cup pecans, coarsely chopped
Direction:
For the dough:
1) Mix and knead together all the dough ingredients in a stand mixer, bread machine, or by hand to form a smooth, soft dough. Add more milk or water if the dough seems too stiff.
2) Place in a greased bowl. Cover with a towel. Set in a warm place and let raise until almost doubled, about 1 to 1 1/2 hours.
For the filling:
Mix together all the filling ingredients thoroughly in a small bowl.
For the syrup:
Butter a 13 x 9 x 2-inch glass baking dish. Combine maple syrup and butter in heavy medium skillet. Stir over medium heat until butter melts. Remove from heat. Mix in brown sugar. Pour syrup into prepared dish; tilt to coat of bottom of dish evenly. Sprinkle the pecans; cool
To assemble and bake:
1) Roll out dough on a lightly greased counter to an 11 x 20 inch rectangle. Spread the soft butter all over the dough, leaving a narrow strip free of butter along one long edge. Sprinkle with filling ingredients.
2) Starting with the buttered long edge, roll up the dough and pinch the edges to secure. Cut dough with a sharp, serrated knife into 1-inch rolls. Place in prepared baking dish. It’s okay to crown the buns a bit.
3) Cover and let raise until quite puffy, about 45 minutes to 1 1/4 hours. Preheat oven to 375° F.
4) Bake buns uncovered until tops are golden brown and syrup bubbles thickly, reversing dishes halfway through baking, about 25 minutes. Remove from oven and immediately invert onto a baking sheet. Cool for 5 minutes. Serve warm with lots of butter. (Can be made ahead. Cool buns completely. Wrap buns tightly with foil on baking sheet. Freeze up to 2 weeks. Bake frozen buns covered 375°F until heated through, about 15 minutes.)
Makes approximately 14 buns


Maple Pecan Sticky Buns
Reuben and Erica


Until after the honeymoon!

Chocolate Layer Cake with Peanut Butter Frosting


Chocolate Cake with Peanut Butter Frosting | Buttered Side Up
Chocolate Cake with Peanut Butter Frosting
Chocolate Cake with Peanut Butter Frosting | Buttered Side Up

I have a few (random) things to say to you:

1) May must be the month of illness, because we had three or four bouts of it last month. Helen has been going back and forth between being a pro sleeper to refusing naps and bedtime. No more colds, please!
2) Because of all the craziness surrounding sickness, I have had very little energy to get things done once Helen is in bed. Thus the lack of posts (sorry!).
3) I wasn't going to take pictures of this cake because I was exhausted tired from making it. Once I tasted it and realized how delicious it was, I knew I wanted to share the recipe with you guys. So I pulled out my tripod as the light was fading and snapped away.
4) Did I mention how scrumptious this cake is? It's kind of like a peanut butter cup in cake form. I could eat the frosting by the spoonful. 


What's life been like for you lately?


Note: Since I have a thing for small cakes, I halved the recipe and baked the batter in 6-inch pans. If you want to make a regular sized cake just double everything and cook the cake in a 9x13-inch pan or two 8-inch round cake pans.


Chocolate Layer Cake with Peanut Butter Frosting.

Ingredients:

For the Cake:
  • 1 cup all-purpose flour
  • 1 cup organic sugar
  • 1/8 teaspoon real salt
  • 2 heaping tablespoons cocoa powder
  • 1/2 cup (1 stick) butter
  • 1/2 cup boiling water
  • 1/4 cup buttermilk or sour milk
  • 1 large egg, lightly beaten
  • 1/2 teaspoon baking soda
  • 1/2 teaspoon pure vanilla extract
For the Frosting:
  • 8 ounces cream cheese, softened
  • 2/3 cup peanut butter
  • 1/2 cup (1 stick) butter, softened
  • 1 cup powdered sugar, sifted
  • 1/2 teaspoon pure vanilla extract

Directions:

To make the cake:
1) Preheat oven to 350 degrees F (175 C). Butter two 6-inch round cake pans and line with a round of parchment paper on the bottom.

2) In a medium bowl, whisk together the flour, sugar, and salt.

3) Boil the water. Meanwhile, melt the butter in a small saucepan. Stir in the cocoa powder, then the boiling water; boil for 30 seconds and remove from heat. Pour over the dry ingredients and give it a gentle stir.

4) Whisk together the buttermilk, egg, baking soda and vanilla. Stir into the chocolate batter and mix just until combined. 

5) Pour into the prepared pans and bake until a toothpick comes out nearly clean, about 20 minutes (check at the 15 minute mark). Remove from oven and allow to cool in the pans for 10 minutes before turning out onto a cooling rack.

To make the frosting:
Place the cream cheese in the bowl of a stand mixer fitted with the whisk attachment. Beat until smooth. Add the peanut butter and beat again, scraping down sides of bowl as necessary. Add the butter and beat until smooth again. Beat in the powdered sugar and vanilla.

To assemble the cake:
1) Once the cakes have cooled completely, cut each one in half horizontally. You can either leave the dome on one of the cakes or level them both off. 

2) Place one layer on a cake stand or plate and put strips of parchment just underneath to keep the surface tidy. Spread with frosting to create a layer that's about 1/4-inch thick. Repeat with remaining layers, ending with the domed layer if using. 

3) Frost the top of the cake and put a thin "crumb coating" on the sides. Refrigerate cake until the crumb coat is firm, then add the rest of the frosting to the sides (or save a bit for eating on its own). Remove the parchment strips, slice and enjoy!