Showing posts with label Snacks. Show all posts


Pizza Stuffed Mushrooms

Sometimes, you just KNOW a recipe is going to be good before you make it. Some combinations of ingredients are just hard to mess up. I mean, how could Pizza Stuffed Mushrooms be bad?!

These were far, far from bad. I wanted to eat the whole pan by myself. But I selflessly shared them with Helen, Susan (her cousin) and Reuben. They all enjoyed them. 

I think these would be a smashing appetizer for just about any occasion. You could make them up beforehand and pop them into the oven at the last minute. Just be sure to make lots - they'll be gone in a flash.


Pizza Stuffed Mushrooms
Recipe adapted from Tasty Kitchen
Makes 3 servings

Ingredients:
  • 10 baby bella mushrooms
  • 4 ounces (half a package) of cream cheese
  • 1/4 cup grated Parmesan cheese
  • 1/4 teaspoon dried basil
  • 1/8 teaspoon dried oregano
  • 1/8 teaspoon garlic powder
  • salt and pepper, to taste (I didn't need any)
  • 1/4 cup finely diced pepperoni (I like this brand)
  • 2 tablespoons finely chopped green bell pepper
  • 2 tablespoons finely chopped red onion
  • 2 tablespoons finely chopped black olives.
Directions:

Preheat your oven to 350 degrees F (175 C). Line a baking sheet with parchment paper or a silicon baking mat.

Wash and dry your mushrooms. Scoop out the stems with a spoon. Set aside.

In a small bowl, combine the cream cheese, Parmesan, basil, oregano, garlic powder, salt and pepper (if using), pepperoni, green pepper, onion and black olives. Make sure everything is well combined. 

Fill and mound each of the mushrooms with the filling. Place on the prepared baking sheet and bake in preheated oven for 20-25 minutes, or until nicely browned. You can also place them under the broiler for a minute or two to brown the tops. Serve hot (they cool down quickly).

Pizza Stuffed Mushrooms


Caramel Corn | Buttered Side Up

For some reason I used to have a fear of homemade caramel corn. Which is quite silly since I had never tried my hand at making it. I just assumed that the stuff from the store (full of highly processed ingredients) could not be recreated at home. Boy, was I wrong.

My sister made a batch of caramel corn and it was AMAZING. My preconceived notions about homemade caramel corn melted away. 

Caramel corn is one of the more addicting foods. It's sweet, but it's also salty, so you don't get overloaded on either flavor. It's so easy to toss kernel after kernel into mouth.

I'm sad that we already finished off this batch. Which can easily be remedied...


Homemade Salted Caramel Corn 
adapted from King Arthur Flour
Makes about 15 cups

Ingredients:
  • 1/2 cup unpopped popcorn (to make about 15 cups popped)
  • 1/2 cup (1 stick) butter (if using unsalted, you may want to add a bit of salt to the caramel)
  • 2 tablespoons unsulphered molasses
  • 3/4 cup sucanat
  • 1/4 cup honey
  • 1/2 teaspoon baking soda
  • Coarse sea salt, to taste

Directions:

1) Pop your popcorn. Place in a (very) large bowl. Line a large roasting pan with parchment paper. If you don't have a roasting pan you can use two 13 x 9 pans. Preheat your oven to 200 degrees F (95 degrees C). 

2) Melt the butter in a medium saucepan. Add the molasses, sucanat and honey. Stir and cook until the sugar dissolves. Bring to a boil and simmer, stirring occasionally, for 5 minutes.

3) Remove from heat and stir in the baking soda. Don't be alarmed - the mixture will foam and get airy. Pour over popped popcorn and toss to coat evenly.

4) Spread in the prepared pan and sprinkle with coarse sea salt to taste. Bake in preheated oven for an hour, giving the caramel corn a stir every 15 minutes or so. 

5) Remove from oven and allow to cool slightly before attempted to eat. Once it's completely cool you can store it in an airtight container for a few days. It probably won't last that long.

Homemade Salted Caramel Corn Recipe


Guacamole
Guacamole
Guacamole
Guacamole
Guacamole
Guacamole
Guacamole
Does anyone else always think of the Rhett and Link song whenever they make guacamole? No? Just me? Well, it ensures that I will never misspell guacamole.

Guacamole wasn't something that I grew up on. I can't remember who first introduced us to the amazingly creamy and flavorful snack. Once I started making it, I was addicted. 

My recipe is pretty simple - no frills. I've been making the same one for over 5 years. If tomatoes are your thang, go ahead and add some. You can also customize the heat and other spices. If you aren't big on cilantro, cut back a bit. My point: taste as you go and make it your own.

By the by, I love my garlic twist. You can use it to mince small amounts of onion as well as garlic.


The Best Guacamole Recipe
makes about 6 servings | Printable Page

Ingredients:
  • 3 medium, ripe avocados, preferably Haas
  • 2 tablespoons finely minced onion
  • 1 medium garlic clove, minced
  • 1 small jalapeno chile, stemmed, seeded, and minced (I usually leave this out since Reuben doesn't like heat)
  • 2 tablespoons – 1/4 cup fresh cilantro leaves, chopped
  • 1/4 – 3/4 teaspoon sea salt, or to taste
  • 1/2 – 3/4 teaspoon ground cumin, or to taste
  • 1 – 2 tablespoons lime juice, or to taste
Directions:
1) Cut the avocados in half, remove the pits, and score with a knife in several places both lengthwise and crosswise. Use a spoon to remove the flesh into a medium-sized bowl.
2) Add the remaining ingredients to the avocados. Mash lightly with a potato masher or fork and stir until well combined. Taste and adjust seasonings if necessary. For best flavor, allow the ingredients to meld: press a piece of plastic wrap onto the guacamole and place in the refrigerator for 1 hour. Serve cold or at room temperature.

Guacamole
And, just for fun, here is the neon-green photo I posted on Cooking for Seven 5 years ago, complete with watermark. Ha!

Note: Some links are affiliate. All opinions are my own and I would never share a product with you guys that I haven't already tested unless otherwise stated.

Guacamole


Homemade Tortilla Chips

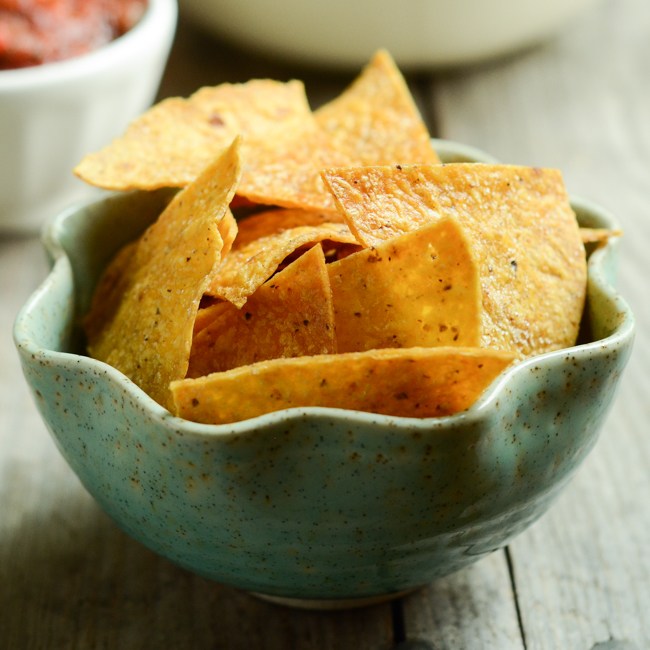
Tortilla chips are one of those things that's really hard to find a truly healthy version of in stores. Even if they're made with organic corn, they're nearly always made with a polyunsaturated fat. What's a chip lovin' girl to do? Deep fried chips are delicious, but it's way too much work to heat up the oil and grease up your kitchen on a regular basis. 

My grandma is a big fan of The Food Network. A while back when I was visiting her we sat down to watch some cooking shows. Giada was on, and she made baked tortilla chips. It looked ridiculously easy. I tried it, and it was (ridiculously easy).


Here's the super simple process:

Homemade Tortilla Chips
Everything you'll need: Tortillas, coconut oil and salt. That's it!


Homemade Tortilla Chips
Brush both sides of the tortillas evenly with the oil.


Homemade Tortilla Chips
Cut into triangles.


Homemade Tortilla Chips
Arrange on a baking sheet.


Homemade Tortilla Chips
Bake until golden and crispy. And you're done!


Homemade Tortilla Chips
These chips are (of course) best eaten fresh, so I like to make them in small batches.


Homemade Baked Tortilla Chips
recipe from Giada | makes about 2 servings

Ingredients:


Directions:
Preheat your oven to 350 F (175 C) 

Brush each side of the tortillas evenly with the melted coconut oil. Cut into triangles with a big knife. Arrange on a baking sheet and sprinkle with salt.

Bake in preheated oven until golden and crispy, about 15-17 minutes (you might want to start checking the tortillas at the 12 minute mark). Cool completely and store in an airtight container.


Homemade Tortilla Chips


Note: Some links are affiliate. All opinions are my own and I would never share a product with you guys that I haven't already tested unless otherwise stated.

Homemade Baked Tortilla Chips

.
:: Graham Crackers ::
.
Adapted from King Arthur Flour
  • 2 cups (8 ounces) Whole Wheat Pastry Flour
  • 1/4 cup Sucanat
  • 1/2 teaspoon sea salt
  • 1 teaspoon cinnamon
  • 1 teaspoon baking powder
  • 1 large egg
  • 1/4 cup butter or coconut oil, melted
  • 1/4 cup (3 ounces) honey
  • 2 to 3 tablespoons (1 to 1 1/2 ounces) milk (approx.)
  • additional milk for glaze
  • cinnamon-sugar (optional)
In a mixing bowl, combine whole wheat flour, sucanat, salt, cinnamon and baking powder. In a separate bowl, beat egg till light, then add butter, honey and 2 tablespoons milk. Stir into dry ingredients until you have a fairly stiff dough, adding additional milk if necessary. Wrap dough in waxed paper and chill until firm, about 1 hour (or longer, if it’s more convenient).
Turn the dough onto a floured surface and knead gently until it holds together. Roll dough out till it’s about 1/16-inch thick; make sure rolling surface is well-floured, or you’ll have trouble transferring crackers to baking sheet. Alternately, you can use a pasta machine to roll out your crackers. This makes the whole process a lot easier.
Preheat your oven to 375°F. Cut dough into 3-inch squares, or use a cookie cutter to cut into any shape you please. Prick each square several times with a fork, and place on lightly greased cookie sheets. Brush the tops with milk, sprinkle with cinnamon-sugar if you’re so inclined, and bake for 15 to 20 minutes, or until crackers are lightly browned. Remove crackers from oven, transfer to a wire cooling rack, and cool completely. Store in an airtight container. Makes about 2 dozen graham crackers.

Homemade Graham Crackers