Showing posts with label Savory. Show all posts

Pulled Pork in the Crockpot-Slow Cooker | Buttered Side Up
I didn't invest in a crockpot until I got pregnant. Everyone raved about how easy it is to cook delicious meat in one, but it seemed like a superfluous appliance to me. But the list that my midwife gave me for my birthing kit suggested that I have a crockpot on hand. So I purchased a generic one at Walmart. I didn't actually use it during labor, but it's been very useful since then!

My mom was the one who got me into pulled pork. She made it for after-church-dinner a few times, and Reuben got hooked. When she sent me the recipe, I was shocked by how easy it was. Her pork was always so tasty - how could so few ingredients produce so much flavor? But they do.

Here's the super easy steps to get delicious pulled pork:


Pulled Pork in the Crockpot-Slow Cooker | Buttered Side Up
Slice up an onion and place it in the bottom of your crockpot. I didn't have quite a full onion, but that's okay.


Pulled Pork in the Crockpot-Slow Cooker | Buttered Side Up
Put a pork shoulder (AKA butt) roast on top of the onion and season well with salt and freshly ground pepper.


Pulled Pork in the Crockpot-Slow Cooker | Buttered Side Up
Pour in about 1 -1 1/2 cups of broth (you could also use water or another liquid, but it probably won't be as flavorful).

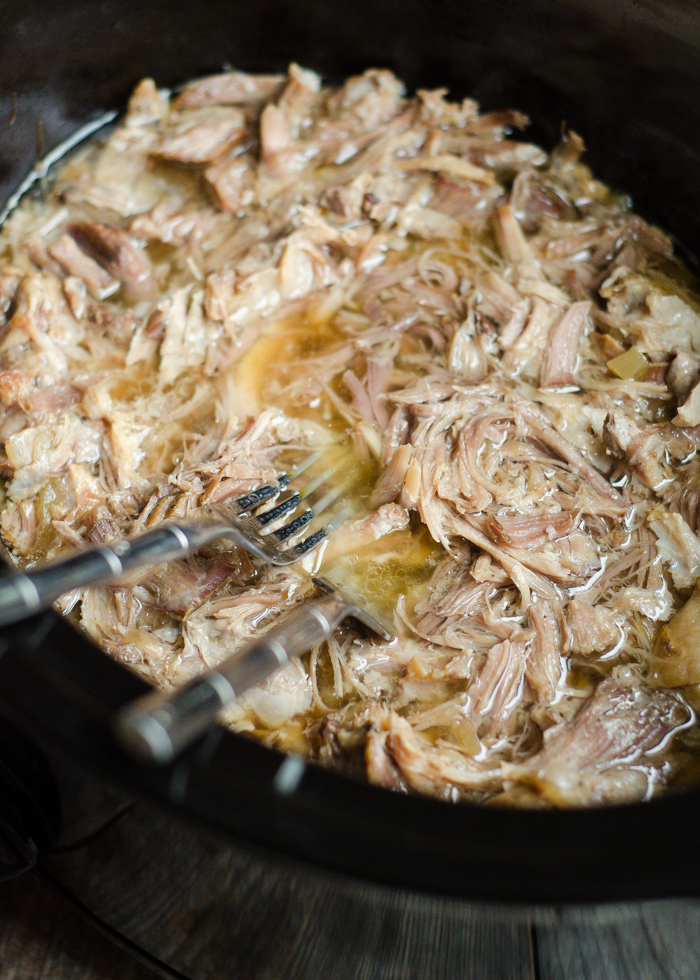
Cook on low for about 8 hours or overnight. If you want your pork ready at 6:00 PM, start it at 10:00. Once the pork is done cooking, pull it apart with two forks.

Serve with lots of BBQ sauce. This goes really well with crispy baked potatoes (I'll share the recipe someday!) or homemade buns. Mmhmm.


Pulled Pork in the Crockpot-Slow Cooker | Buttered Side Up


Easiest Pulled Pork in the Crockpot/Slow Cooker
recipe from my mom. | PRINT
A super easy and flavorful way to cook pulled pork! Serve with BBQ sauce.

Serves 6-8

Ingredients:
1 onion, sliced,
1 pork shoulder/butt roast,
salt and pepper to taste,
1 - 1.5 cups broth,

Instructions:

Place the onion in the bottom of a slow cooker. Put the roast on top and season well with salt and pepper. Pour in the broth.

Cook on low for 8 hours. Pull the pork apart with two forks.


Easiest Pulled Pork in the Crockpot/Slow Cooker


This post was first published on May 7, 2010 on Cooking for Seven. I always considered it some of my best work, so of course I wanted to share it here on Buttered Side Up. I also included the original comments because there was some good conversation and suggestions for cooking morels...

001
Each spring, around the time of opening fishing, when the ferns begin to pop up, we head out with our mesh gathering bags to hunt for morel mushrooms. We have a special spot down the road that is nearly guaranteed to give us a few of these delectable little fungi.


Morel Mushrooms
Yesterday, about an hour before supper, I decided it was high time we visited our secret hunting ground. We spent about half an hour of careful search & brought home enough mushrooms to complement our dinner.


Morel Mushrooms
So if you find yourself with a few of these precious mushrooms, please: eat them plain, cooked in butter & seasoned with salt and pepper. Don’t put them in a soup or pasta dish. They are far too good by themselves. Or with bleu cheese. Yes — Bleu Cheese!


TO COOK MOREL MUSHROOMS

Ingredients:

  • Butter
  • Morel Mushroom
  • Salt & Freshly Ground Black Pepper

Directions:

1) Cut the mushrooms in half lengthwise & remove any dirt or bugs.

2) In a medium skillet, melt a generous amount of butter. Add the mushroom & season with salt & pepper to taste. The mushrooms with release their “juices” and the skillet will become saucy.

3) Cook until most of the liquid is gone & the mushrooms begin to darken. Transfer to a serving bowl and eat/devour immediately.


Morel Mushrooms


Morel Mushrooms


20 Responses to “A-Hunting We Did Go…”

Maria says:
Thank you for posting your mushroom hunting adventures. I miss those days. Great photos! Eat a few for me:)

Yum! What a fun family activity! 

Valerie says:
I love mushrooms, but I’ve never had the good fortune to try morels. I have not seen them in the stores where I live (Western Massachusetts), but I’ll try to find some soon!
I’ve only just been pointed to your site, and I browsed through some of your older posts. Oh MY but your photography is lovely! And your recipes look so good. I can’t tell you how many I’ve filed away in all my recipe bookmarks. And through it all your style is elegantly simple and comforting, both in substance and writing. Very well done. I look forward to following you. 

joanne says:
wow! those are some beautiful mushrooms!! i love your blog, such yummy recipes! thanks for sharing…joanne

Keren says:
Wow, you found alot! My Mom and Dad went looking for them and found a grand total of two. 

Jessy says:
Such a brave young woman, hunting for mushrooms in the wild! We had some mushrooms in the woods near our home (we were looking for morels, but didn’t find any  :( ) We did come across some gigantic ones, however, larger than a basketball! We had no idea what they were but when we came home we looked them up online and found they were called “giant puffball.” They’re said to be delicious. Have you ever tried them?

Jim-49 says:
“Oh My”,bringing back memories!! I was on a job in Southern Ohio,and a friend,said lets go get some of these wonderful things.I had never hunted these before,so we went up to his daddy’s house,and found 2 large grociery bags,they were great!! We,sliced them as you did,and put them in some salted cornmeal,and fried them,oh so good!!! Taste just like a southern favorite fish,the old mullet.The post sure stired old friendship,and a wonderful meal,”Thanks”!!

Jenn says:
Hi Erica, Just found your wonderful blog through Tastespotting. What beautiful photos! Your food looks delicious and simple…I look forward to reading more!

I love morel mushrooms although I haven’t had any in years. I recall the spring hunts we went on in Michigan when my ex-husband and I would visit his family.
Before then, whenever I heard about people hunting for mushrooms I was not interested, never sure of whether one would be poisonous or not. But look at those things…they are hard to spot they are so unique in appearance.
True story…so abundant that they were available fried at the local A&W Root Beer stand…now to get them I would have to pay $40/lb. Think I’ll just have to keep the memory.

Kaitlin says:
I am SO jealous! My brother and I went out looking for morels today but didn’t find any.
We did get a bag full of asparagus, though. YAY!
This sounds amazing right now. I love your photos, too!

Ellie says:
What fun it is to hunt for your own mushrooms! Life little pleasures.
helsbells says: May 9, 2010 at 1:41 pmHi, I really like your blog, I think the granola recipe looks delicious, can’t wait to give it a try.

Miranda says:
Hey there! I also discovered your blog through Tastespotting. I bought some morels from the grocery store recently (at $40 a pound!) and read that I should cut them in half, soak them, and then rinse them. I rinsed them pretty thoroughly to remove all of the sand and dirt, but when I took a bite of the cooked morels, they were still realllly gritty. I was so bummed and had to throw them out. Any help would be awesome!


Erica Lea says:
May 10, 2010 at 6:33 pm
Thank you all for your very kind words.
Jessy: No I have never tried puffballs, but I think I’ve heard they’re good.
Jim: Hmmm…dipped in cornmeal & fried sounds delicious.
Miranda: We’ve had that happen to us as well. Your mushroom were probably not harvested correctly. Dad makes sure we break the mushrooms off above the ground so we don’t get any dirt. Other than rinsing them really well, I don’t know what you could do to get rid of that grit.


Elizabeth says:
May 11, 2010 at 9:05 am
Jessy, my grandpa tells stories of eating puffballs when he was a boy. At that time, his father was ill and money was super-tight around the farm – puffballs were free and filling. He says his mother fried them up in butter, much like you would eggplant. Just be sure the puffballs are nice and young when you pick them – if there’s any tinge of yellow to the flesh, you’re too late.


Elizabeth says:
May 11, 2010 at 9:07 am
also: be sure you peel the puffball. The outer skin is chewy and nasty.


May 15, 2010 at 7:32 pm
Stunning! I wish that I was so lucky to have a secret spot with mushrooms. I adore mushrooms.


November 21, 2010 at 9:14 am
Beautiful pictures, how I would like to get in on that bowl of morels. now that its so cold, its hard to imagine going out to pick mushrooms. Thought you might be interested in this video I did on morels http://bit.ly/8Yrcby -there’s another about chantarelles too, have you picked them before? soooo good. thanks for your work.
daniel


ashleyenfrance says:
In France these precious mushrooms are 30€ a kilo, so precious indeed. Also, another good way of eatting them is to cook them with butter, garlic, and parsley. Then add sea salt at the end.

A-Hunting We Did Go | Fried Morel Mushrooms

Chive and Cream Cheese Sandwiches with Edible Flowers | Buttered Side Up
When I was a teenager, my sisters and I loved to plan tea parties with our friends. We would assign the courses (soup, sandwiches and salads) to each family, and everyone brought an appetizer and a dessert.


Tea Party Circa 2008
Photo taken circa 2008
We would have them about quarterly, if my memory serves me well. It was loads of fun to dress up for, and we were able to sample lots of new flavors.


Tea Party Circa 2010
Photo taken circa 2010
When I made these sandwiches a few weeks ago, it brought me right back to our tea party days: most likely because we actually made sandwiches that were very similar once. I was flooded with memories of the excitement of hosting or going to a party. And it made me want to have another one. 

Perhaps I will, when I get up the gumption. The last time I hosted a tea party it was exhausting, and that was before I had Helen...


Chive and Cream Cheese Sandwiches with Edible Flowers | Buttered Side Up
But about these sandwiches. 

They are so simple (only five ingredients!) that it hardly seems that there could be much flavor to them. But the dearth of ingredients lets each one shine through. If you were to spread the bread with something more assertive, you would lose the subtle flavors of the flowers and herbs on top.

These are certainly tea party fare. They're fancy little sandwiches. When I brought the leftovers from the shoot to my sister's family, her little girl said, "They're so pretty I don't want to eat them!" And her little three-year-old daughter said, "I am so glad that you made those for us." It definitely helped to improve my "cool aunt" image. Though probably not so much with the boys. ;) 


Chive and Cream Cheese Sandwiches with Edible Flowers | Buttered Side Up

Notes:
  • * I'm sure you already know this, but it's best to use flowers that are free from pesticides. You never know what they might have sprayed on them if they aren't meant to be eaten.
  • * Here, here, and here are lists of flowers that are edible.
  • * If you want a sandwich that is a bit heartier, you can add a slice of prosciutto or ham on top of the cream cheese.


Cream Cheese and Chive Sandwiches with Edible Flowers
adapted from Grown to Cook | Print

Dainty little sandwiches, perfect for a tea party!

Serves about 6

Ingredients:
1 8-oz package of cream cheese,
1/4 cup chopped fresh chives,
1 small loaf of French bread,
fresh herbs for garnish (I used dill, chives, and mint),
fresh edible flowers for garnish (I used the Mirco Flower Blend and Nasturtiums that Marx Foods gave to me).

Instructions:

1) In a medium bowl, blend together the cream cheese and chives (a hand mixer works well for this).
2) Slice the loaf of bread on the diagonal. Spread each piece with the cream cheese mixture. Arrange the herbs and flowers on top.
3) Serve immediately or store in the refrigerator for a few hours. You'll want to wait to garnish the sandwiches with the herbs and flowers until just before serving.


Also, the winner of the Marx Foods Photography Challenge has been announced: I made it to the final three (thank you to all who voted me into the finals!), but the prize goes to Manda of The Merry Thought. Go see the winning photo here


Many thanks to Marx Foods for providing the flowers for this post. As always, all words and opinions are my own.


Cream Cheese and Chive Sandwiches with Edible Flowers


Cream Leek, Asparagus, and Bacon Pasta | Buttered Side Up


Writing definitely does not come easily to me. Sometimes it is SO difficult for me to write up a recipe. I'll have my photos all edited and inserted into the post, only to have them sit in a draft for days because I cannot think of how to begin.

I've struggled with this for over 6 years of blogging. 

I love telling you guys how much I enjoyed a dish, but often times words fail me. Thank you for coming back time and again to read my awkward posts. Thank you for the encouraging (and challenging) comments that you leave. 

Now let me try to describe this awesome pasta.

Before cooking this dish, I had never worked with leeks. I had to look up a video to learn how to clean and chop them. This charming vegetable comes into season in the early spring, so I thought it would be a good choice to share a recipe here on Buttered Side Up that included them. Asparagus is also in season, so I picked up a bunch at the grocery store. Then I realized that they would be a lovely addition of green to my pasta.

The resulting combination of creamy, salty, starchy and fresh made for one delicious meal.

The beauty of this pasta is that it can easily be customized to your preferences. I really like green peas in carbonara. I've never tried it myself, but the recipe I based this pasta off of calls for pancetta. And you don't HAVE to use Tagliatelle - use whatever pasta you have on hand! 

If you decide to make my pasta, make sure to share and tag me on Twitter, Instagram, or leave a comment with a link to your post!


NOTE: If you like crispy bacon, make sure to only add the bacon to the pasta at the end of cooking. I didn't do this, but I definitely will next time.

Creamy Leek, Asparagus and Bacon Tagliatelle
adapted from Blogging Over Thyme | serves 3-4 (depending on how hungry you are) | PRINT

Ingredients:
  • 2 tablespoons butter
  • 6 ounces bacon, finely diced
  • 1/2 of a leek, finely sliced
  • 1/2 cup (7.5 ounces) asparagus, cut on the bias
  • 1 clove of garlic, minced
  • salt, to taste
  • 1 1/2 cups heavy cream
  • 3 egg yolks
  • 1 cup freshly grated parmesan cheese
  • 8 ounces Tagliatelle pasta

Directions:
1) Get a large pot of water going for the pasta. In a large cast iron skillet set over medium-low heat, fry the bacon until crispy. Remove to a bowl and set aside. 

2) Turn heat up to medium. Add 2 tablespoons of butter to the pan. Once melted, add the leek and asparagus. Season with salt. Cook, stirring occasionally, until tender, about 7-10 minutes. Add the garlic and cook 1 more minute. Remove all to a bowl and set aside.

3) Cook pasta according to package instructions, making sure to generously salt the water.

4) Meanwhile, pour the cream into the skillet (set on low heat) and whisk until hot. Slowly ladle half of the cream into the egg yolks, whisking constantly. Return to pan and cook, whisking, until slightly thickened. Stir in the parmesan until melted. Add the vegetables, pasta and bacon. Serve immediately with extra parmesan.


Creamy Leek, Asparagus, and Bacon Tagliatelle


Korean Shrimp and Rice Porridge (Saewoojuk)

There's nothing like getting sick to make you appreciate the things you are able to do every day. Last week Reuben fell ill with a fever, chills, headache: the whole shebang. I followed a few days later. We were so miserable and unable to do ANYTHING for days. It was all I could do to make Helen food and watch videos. I was nearly mad with boredom. All of this to say: I had a good reason for not posting for over two weeks. Sorry.

But about this porridge

I must confess that I was first attracted to this recipe because of my interest in the Korean Drama and culture. I was pretty reluctant to give Korean TV shows a try at first, but when I was desperate for entertainment after giving birth to Helen, I softened. To my surprise and characters and stories were very interesting. And all of the dramas that I have seen have been pretty clean and innocent in the romance department, especially compared to American TV shows. 

Food tends to figure fairly largely in K-Dramas - the main characters are shown enjoying various dishes. I may or may not have decided to make Ramen after watching Liar Game. And, when I saw this recipe for Saewoojuk, I was intrigued. Not ONLY because it was a Korean dish, but also because the ingredients sounded amazing. 

It was really delicious. Helen loved it. I can't wait to make more, when I can find some good shrimp to make it with. Also: Helen and I are now addicted to seaweed snacks


Also, if you've watched any K-Dramas (first of all: FRIEND!), let me know your favorites! Some of the shows I have most enjoyed have been (in no particular order): You Who Came From Another Star, Liar Game, and Pinocchio.

Linking up at Buns in My Oven.


Note: some links are affiliate. All opinions are my own. Thank you for supporting Buttered Side Up!

Korean Shrimp and Rice Porridge (Saewoojuk)


Curry Coconut and Lime Chicken Soup - Buttered Side Up

Growing up, my mom would occasionally make something delicious for supper: Chicken Curry. It was a pretty rare occurrence. And it's funny how much we enjoyed it. It was just the sort of thing at which my sisters and I would usually turn up our noses. But we knew that it was awesome.


Curry Coconut and Lime Chicken Soup - Buttered Side Up

Fast forward to my teen years, and I discovered the wonderful world of curries. We sampled Thai curry and completely fell in love. 

We really went through a curry craze. Our mom became quite sick of it. But somehow I kept my love. If a dish is described as having curry, my interest increases.

Curry Coconut and Lime Chicken Soup - Buttered Side Up

The combination of flavors in this soup really hits a home run for me. It's so fresh, bright, and full of life. The coconut milk lends a hint of sweetness. The jalapenos give a barely noticeable kick of heat.

By the by, this recipe was one of the most popular that I ever published on Cooking for Seven. It kind of irks me that the photo in that post was one of my least favorite to accompany one of my recipes. I guess the true character of this curry soup shone through the shoddy photography.


Coconut and Chicken Curry Soup

A fresh and flavorful curry soup.
adapted from Good Life Eats | Printable Page
Serves approximately 6

Ingredients:

olive oil,
3 cups chopped cooked chicken,
1/2 of a large onion, chopped fine,
1-2 tablespoon grated fresh ginger,
1 1/2 cups chicken broth,
1 can (14 ounces) unsweetened coconut milk, full fat,
2 teaspoon curry powder,
1 jalapeño, seeded, minced,
2 tablespoons lime juice,
1 small red bell pepper, sliced thin,
1/2 cup chopped fresh cilantro, plus extra for garnish,
1/2 cup unsweetened chipped coconut, toasted (optional),
2 cups freshly cooked rice (optional).

Instructions:

1) Heat the olive oil in a medium sized soup pot over medium heat. Add the chicken to the oil, season lightly with salt and pepper. Sauté until cooked through and golden. Remove chicken and set aside. Sauté the onion, adding more oil if necessary, until tender.

2) Return the chicken to the pot with the onions. Add the ginger; cook for 1 minute. Add chicken broth, coconut milk, curry powder and jalapeno. Bring to a simmer over medium heat. Add bell pepper and cilantro and simmer an additional 3 minutes. Stir in lime juice. Season to taste with salt and pepper.

3) Optional: Spoon rice into 4 bowls. Top with a ladle or two of soup. Garnish with additional cilantro and a sprinkling of shredded coconut. Serve.


Curry Coconut and Lime Chicken Soup - Buttered Side Up

Coconut and Chicken Curry Soup


Homemade chicken broth can be so easy when you use a crockpot/slow cooker!

How to Make Chicken Broth in the Crock Pot - Buttered Side Up
One of my scariest kitchen mishaps actually involved homemade bone broth.

I had a pot bubbling away on the stove. Suddenly, we had to leave the house for an hour or so. You guessed it: I left the stove on by mistake. While we were headed back home, I remembered that I had left the broth simmering. I wondered if we would return to a house of cinders.


How to Make Chicken Broth in the Crock Pot - Buttered Side Up

"Well, at least the house didn't burn down," I said as we pulled in the driveway. But when we opened the front door, we were met with an acrid smoke. The broth had boiled completely away, leaving a charred chicken carcass. I felt so stupid. Our house stank for days. My poor pot still bears the marks.

Needless to say, I was a bit paranoid about making broth after that incident. 


How to Make Chicken Broth in the Crock Pot - Buttered Side Up

Then, I saw Mommypotamus making broth in her crockpot. Brilliant, I thought! I tried it for myself, and I fell in love. 

You see, broth is super easy to make, but it takes a LONG time to cook. It can be difficult to find a good block of time to simmer it to perfection. With the slow cooker, I can throw everything together in the evening, set it to low and simmer it all through the night and the next day.


How to Make Chicken Broth in the Crock Pot - Buttered Side Up


Here are a few tips and tricks for making your own broth:

* Make sure you buy organic veggies that are on the "Dirty Dozen" list. Onions are on the "Clean 15," so I buy those conventional or local.

* You can use a whole, uncooked chicken as well as the carcass of a roasted chicken. The meat will fall off the bones.

* Don't boil your broth too hard - it can result in broth that doesn't gel.

* If you get enough fat in your broth, you can actually store it in the refrigerator for up to 6 months, as demonstrated by Diana of My Humble Kitchen.

* You can always add extra gelatin to your broth if you so wish. I use this brand.

* Don't be afraid to use whatever vegetables you have on hand in your broth. Some ideas: mushrooms, garlic, potatoes, various herbs, and even kombu, AKA kelp (idea from Joy the Baker).

* If your chicken comes with the giblet and liver, throw those into the pot as well!

* Don't salt your broth too heavily before it's done simmering. Taste and adjust AFTER it has reduced.


How to Make Chicken Broth in the Crock Pot - Buttered Side Up

I would love to talk more about bone broth, but this post is long enough as it is. Maybe I'll have to do a follow-up post about the benefits of bone broth, how to store, and ideas for how to use it.

What was your biggest kitchen disaster? 


How to Make Chicken Broth in a Crockpot/Slow Cooker 
recipe adapted from Weston A. Price and Mommypotamus | makes about 6-8 cups of broth
Printable Page

Ingredients:
  • 1 chicken carcass
  • cold water
  • 1 large onion, chopped
  • 3-4 carrots, chopped
  • 3 celery stalks, chopped
  • 1/4 cup vinegar or lemon juice
  • a bunch of parsley, optional (for added minerals)

Directions:
Place the chicken carcass in your slow cooker and add enough cold water to cover. Add the onions, carrots, celery and vinegar and stir. Let sit for 30 minutes.

Add the salt and turn the crockpot to LOW. Simmer the broth for at least 6 and up to 48 hours. 10 minutes before the cooking time is up, add a bunch of parsley. Taste and adjust salt if necessary.

Allow the broth to cool until warm. Strain into storage containers. Refrigerate or freeze.


How to Make Chicken Broth in the Crock Pot - Buttered Side Up


Note: some links are affiliate. All opinions are my own.

How to Make Chicken Broth in a Crockpot/Slow Cooker


Philly Cheese Steak Pizza | Buttered Side UpPhilly Cheese Steak Pizza | Buttered Side UpPhilly Cheese Steak Pizza | Buttered Side UpPhilly Cheese Steak Pizza | Buttered Side UpPhilly Cheese Steak Pizza | Buttered Side Up

Pizza has long been a favorite thing for me to make at home. It's grand to be able to enjoy such a delicious treat without the guilt of eating highly processed ingredients. It's fun to come up with different flavor combinations.

But homemade pizza is a lot of work; and it can be quite time consuming.

Some of that time can be shaved off by not having to wait for your pizza crust to rise for an hour. With Fleischmann's Pizza Crust Yeast, all you need to do is mix up the dough and shape it. It's ready to bake right away. If you have a few ingredients prepped beforehand, homemade pizza can actually be a feasible weeknight meal!


HERE ARE A FEW TIPS FOR A SPEEDY PIZZA:

  • When you make the sauce for your pizza, make a double batch and refrigerate or freeze half for next time.
  • If you have a weekly prep day, wash and cut all the veggies for your pizza. Cook the meat. Shred the cheese.
  • Use a rapid-rise yeast for those days when you have NO time to wait for the dough to rise.


My one disappointment with this yeast was the number of ingredients. I know they need to add those items to facilitate the quick rise time, but I'm a bit sad to use ingredients that I can't pronounce. However, if it's a choice between takeout and homemade pizza, it's pretty obvious which one will be more healthy. So I don't really bad guilty about using this yeast.

This year, I'd like to try to have a monthly pizza night. Fleischmann's yeast will make it quite doable. And I'm sure Reuben will be thrilled to know that he's ensured homemade pizza at least once a month.

When I asked Reuben what pizza I should make for you guys, he suggested a Philly Cheese Steak Pizza. This man is a genius. And this pizza was delicious. One of the best I've ever made. It was excellent cold as well.


RECIPE NOTES:
I like my pizza crust a bit sweet, so I added some extra sugar to the dough. It helped to balance out all the savory flavors.
If you prefer a crispy crust, I suggest lowering the oven temperature to about 400 - 425 F and increasing the baking time.
This recipe may look long, but all that's required is sauteing the veggies, cooking the meat, making a cheese sauce, and mixing up the dough. Don't get overwhelmed! 
You can ask your butcher to slice your steak very thin if you can't find any already packaged up for you.


PHILLY CHEESE STEAK PIZZA RECIPE
Makes one large (12-13") pizza
Printable Page

Ingredients:

For the cheese sauce:
  • 2 tablespoons butter
  • 2 tablespoons organic all purpose flour
  • 1/2 cup whole milk
  • 1/4 cup shredded provolone cheese
  • 1 tablespoons Parmesan cheese
  • 1/8 teaspoon salt
  • pinch of fresh ground black pepper

For the toppings:
  • 4 1/2 tablespoons butter, divided 
  • 1/2 sweet onion, finely chopped
  • 1/2 green bell pepper, sliced thin
  • 1/2 red bell pepper, sliced thin
  • 4 oz Portobello mushrooms, sliced thin
  • 8 oz. top sirloin steak, sliced thin
  • salt and pepper to taste
  • 1 1/4 cups shredded provolone cheese

For the dough:
  • 1 3/4 - 2 1/4 cups organic all purpose flour
  • 2 tablespoons pure cane sugar
  • 3/4 teaspoon salt
  • 2/3 cup very warm water (120 to 130 degrees F)
  • 3 tablespoons extra virgin olive oil

Directions:

For the toppings:
   In a large cast iron skillet set over medium-low heat, melt 1/2 tablespoon butter. Add the onion, season with salt and pepper and cook, stirring often, until soft and golden, about 20 minutes. Remove to a bowl and set aside.
   In the now-empty skillet, melt 2 tablespoons butter over medium-low heat. Add the peppers and mushrooms, season with salt and pepper, and cook until tender. Remove to a bowl and set aside.
   Turn the heat up to high. Add 2 more tablespoons of butter to the empty skillet. Once the butter is melted, add the slices of steak. Season with salt and pepper. Cook for only about 45-60 seconds per side. Remove to plate. Once the steak is cooled, cut it into small, bite-sized pieces.
For the cheese sauce:
   In a small saucepan over medium-low heat, melt the butter. Whisk in the flour; cook for 1-2 minutes or until bubbly and smooth. Slowly whisk in the milk and cook, stirring constantly, until thick and bubbly, about 2-4 minutes.
   Remove from heat and vigorously stir in the cheeses and salt & pepper. The sauce will be very thick. Taste and adjust seasonings if needed. Set aside.
For the dough:
   Preheat your oven to 450 degrees F. Once the oven is hot, place a pizza stone in the oven to preheat while you're making your pizza.
   In a large mixing bowl, whisk together the flour, yeast, sugar and salt. Add the warm water and oil. Mix together until well combined, about a minute. Gradually add 1/2 cup flour until the dough forms a ball. Add more flour if needed.
   Dump the dough out onto a floured surface (dough will be somewhat sticky). Knead until the dough is smooth and elastic, about 4 minutes. Add additional flour as needed.
To assemble:
   Roll the dough out to a 12-13" circle on parchment paper. Spread the cheese sauce all over the dough. Top with the veggies and meat. Sprinkle the cheese on top.
   Transfer pizza to preheated stone and bake for about 10 minutes, or until the crust is nicely browned and the cheese is melted.

Cheese sauce recipe adapted from Bobby Flay and Betty Crocker. The toppings were inspired by Bobby Flay. Dough recipe adapted from Fleischmann's Yeast.


This post was sponsored by Fleischmann's Yeast. All opinions and words are my own.


Philly Cheese Steak Pizza | With Fleischmann's Pizza Crust Yeast


Pizza Stuffed Mushrooms

Sometimes, you just KNOW a recipe is going to be good before you make it. Some combinations of ingredients are just hard to mess up. I mean, how could Pizza Stuffed Mushrooms be bad?!

These were far, far from bad. I wanted to eat the whole pan by myself. But I selflessly shared them with Helen, Susan (her cousin) and Reuben. They all enjoyed them. 

I think these would be a smashing appetizer for just about any occasion. You could make them up beforehand and pop them into the oven at the last minute. Just be sure to make lots - they'll be gone in a flash.


Pizza Stuffed Mushrooms
Recipe adapted from Tasty Kitchen
Makes 3 servings

Ingredients:
  • 10 baby bella mushrooms
  • 4 ounces (half a package) of cream cheese
  • 1/4 cup grated Parmesan cheese
  • 1/4 teaspoon dried basil
  • 1/8 teaspoon dried oregano
  • 1/8 teaspoon garlic powder
  • salt and pepper, to taste (I didn't need any)
  • 1/4 cup finely diced pepperoni (I like this brand)
  • 2 tablespoons finely chopped green bell pepper
  • 2 tablespoons finely chopped red onion
  • 2 tablespoons finely chopped black olives.
Directions:

Preheat your oven to 350 degrees F (175 C). Line a baking sheet with parchment paper or a silicon baking mat.

Wash and dry your mushrooms. Scoop out the stems with a spoon. Set aside.

In a small bowl, combine the cream cheese, Parmesan, basil, oregano, garlic powder, salt and pepper (if using), pepperoni, green pepper, onion and black olives. Make sure everything is well combined. 

Fill and mound each of the mushrooms with the filling. Place on the prepared baking sheet and bake in preheated oven for 20-25 minutes, or until nicely browned. You can also place them under the broiler for a minute or two to brown the tops. Serve hot (they cool down quickly).

Pizza Stuffed Mushrooms