


I have always wanted to make a cake decorated with flowers. I've admired many a blogger's gorgeous creation.
So, when the folks at Marx Foods contacted me and offered edible flowers for me to play with, I was quite excited. I agreed to participate in a little project they have going on because: A) What girl doesn't want to have flowers sent to her door? B) The farm that produces the flowers uses natural practices (like using garlic, clove, and rosemary oils to keep bugs at bay). C) I've been longing for flowers this spring - April in Minnesota is much too brown for my taste. And D) I thought you guys would really enjoy it!

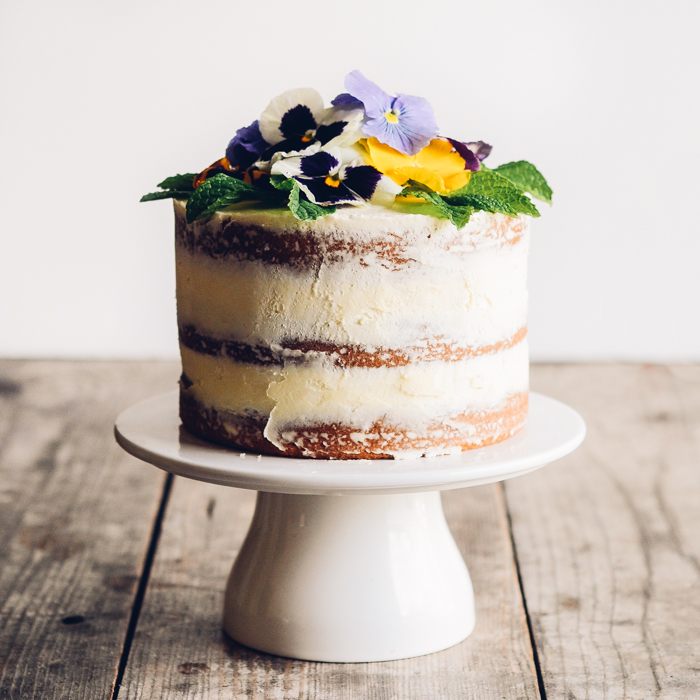
I knew I needed to make a cake to showcase the gorgeous blooms. Reuben is a huge lemon fan, so I settled on a triple lemon layer cake. Plus, lemon and mint pair well, and pansies have a mild wintergreen flavor. I flavored the cake and the frosting only slightly with lemon so the flavor wouldn't be too overwhelming. The lemon curd filling is quite assertive.

The result was a delicious, moist cake with a rich, buttery Swiss Meringue frosting. I think it's the most beautiful cake I've ever created.
When I served it to my family, they were a bit skeptical about eating the flowers (especially the guys). I made everyone take one. But they agreed that it made the cake extra special. My mom said it looked like a mini wedding cake!
Need more ideas for how to use edible flowers? Here are a few ways that I incorporated them into dishes:
- * As a garnish for tea sandwiches (post coming with a recipe).
- * Tossed into a salad (this definitely takes your salad up a notch in sophistication).
- * Frozen into flower ice cubes (very cute).
- * As decorations for cupcakes.
- * Mixed into butter (AKA compound butter).
- * Added to flavored water for a gorgeous drink.
Let me know if there are any other ways to use edible flowers that I missed!
The project that I mentioned earlier that I am participating in is a food photography contest! 8 food bloggers and I have created dishes incorporating edible flowers. Each photo will be posted on the Marx Foods Instagram account. The top 3 photos that receive the most "likes" will advance to the finals.
If you'd like, you can hop over to their Instagram and vote for your favorites. They will be posted on the 5th of May. I'll be posting a photo on my Instagram account once my photo goes live.
NOTE:
I accidentally baked my cakes at 325 instead of 300, and they turned out fine, but they were domed. I recommending baking at the lower temperature so your cakes rise more evenly.
As I mentioned, I didn't flavor the cake and frosting very heavily with lemon so it wouldn't be too overwhelming. If you want a super bold lemon flavor, you can add more extract or some lemon zest to the cake batter and frosting.
After photographing the cake, I decided to use op the remainder of the frosting and pipe rosettes onto the side of the cake. See photo below.
Triple Lemon Naked Layer Cake with Pansies
A gorgeous layer cake topped with fresh, edible flowers.
Recipe adapted slightly from Simple Bites and dessert.design.life. | Print
Serves 10
Ingredients:
For the Cake:
2 cups organic cake flour (I made my own by mixing in cornstarch)
1 teaspoon baking powder,
3/4 teaspoon baking soda,
1/2 teaspoon salt,
1/2 cup (1 stick) butter, at room temperature
1 cup sugar
2 large eggs, at room temperature
1 1/2 teaspoons pure vanilla extract
1 teaspoon lemon extract
1 cup buttermilk (I used milk that was a bit sour mixed with vinegar)
For the Filling:
1 cup of lemon curd (about 1/2 of this recipe)
For the Frosting:
6 large egg whites (180 grams) -- I think it's much easier and more accurate to measure using weight.
1 1/2 cups sugar
3 1/2 sticks (1 3/4 cups) butter, cut into small pieces, at room temperature
1 1/2 teaspoons lemon extract
For the garnish:
Mint leaves
Fresh Pansies (make sure your flowers are pesticide-free!)
Instructions:
To make the Cake:
1) Grease, flour, and line with rounds of parchment paper three 6-inch cake pans. Place the racks in your oven in the middle position. Preheat to 300 degrees F (150 C).
2) Whisk the dry ingredients together in a small bowl.
3) In the bowl of a stand mixer, beat the butter and sugar until well mixed. Add the eggs, one at a time, beating well after each addition. Beat in the vanilla and lemon extracts.
4) With the mixer on low speed, add half of the dry ingredients and mix until well combined. Add the buttermilk slowly while the mixer is running. It may look separated - this is normal. Add the rest of the flour and mix just until moistened. If needed, you can give it another gentle mix with a spatula.
5) Pour the batter evenly into the prepared pans. Bake in preheated oven until lightly browned and a toothpick comes out mostly clean, around 30 minutes or so (it took less time for me because I forgot to use the lower temperature). Remove from oven and allow the cakes to cool in the pans for 15-20 minutes before transferring to cooling racks. Make sure the cakes are completely cooled before frosting (you can place them in the freezer, wrapped in plastic wrap, for 10-15 minutes to speed up the cooling process).
To make the Frosting:
1) Put a pan with about an of inch of water onto the stove and heat until simmering.
2) In the bowl of a stand mixer, combine the egg whites and sugar. Place over the simmering water and cook, whisking constantly, until the mixture reaches 160F (71C), or until the egg whites are hot and the sugar is dissolved.
3) Place the mixer bowl onto the base of the mixer. Using the whisk attachment, beat the mixture until very stiff, glossy peaks form (it took about 10 minutes for me). The bowl should be cooled off at this point.
4) With the mixer on low, add the little butter pieces one at a time, mixing a bit before adding another piece. At this point the frosting may look curdled, but don't freak out. Keep mixing and it will become smooth.
5) Mix in the lemon extract.
To assemble the cake:
1) Place a bit of frosting onto your cake stand or a plate. Put the first layer of cake down. Pipe a ring of frosting around the edge. Fill the ring with half of the lemon curd. Place another layer of cake on top and repeat the filling process. Put the last cake on top, bottom side up. Put the whole cake into the freezer for about 10-15 minutes.
2) Crumb coat your cake, filling in any gaps between the layers, and put a good layer of frosting on top of cake. Scrape away some of the frosting from the side of the cake to make a pretty "naked" cake. Or you can use up the rest of frosting by piping on rosettes, or whatever you wish.
3) Top with mint leaves and pansies. Serve. Store any leftovers in the refrigerator.
A gorgeous layer cake topped with fresh, edible flowers.
Recipe adapted slightly from Simple Bites and dessert.design.life. | Print
Serves 10
Ingredients:
For the Cake:
2 cups organic cake flour (I made my own by mixing in cornstarch)
1 teaspoon baking powder,
3/4 teaspoon baking soda,
1/2 teaspoon salt,
1/2 cup (1 stick) butter, at room temperature
1 cup sugar
2 large eggs, at room temperature
1 1/2 teaspoons pure vanilla extract
1 teaspoon lemon extract
1 cup buttermilk (I used milk that was a bit sour mixed with vinegar)
For the Filling:
1 cup of lemon curd (about 1/2 of this recipe)
For the Frosting:
6 large egg whites (180 grams) -- I think it's much easier and more accurate to measure using weight.
1 1/2 cups sugar
3 1/2 sticks (1 3/4 cups) butter, cut into small pieces, at room temperature
1 1/2 teaspoons lemon extract
For the garnish:
Mint leaves
Fresh Pansies (make sure your flowers are pesticide-free!)
Instructions:
To make the Cake:
1) Grease, flour, and line with rounds of parchment paper three 6-inch cake pans. Place the racks in your oven in the middle position. Preheat to 300 degrees F (150 C).
2) Whisk the dry ingredients together in a small bowl.
3) In the bowl of a stand mixer, beat the butter and sugar until well mixed. Add the eggs, one at a time, beating well after each addition. Beat in the vanilla and lemon extracts.
4) With the mixer on low speed, add half of the dry ingredients and mix until well combined. Add the buttermilk slowly while the mixer is running. It may look separated - this is normal. Add the rest of the flour and mix just until moistened. If needed, you can give it another gentle mix with a spatula.
5) Pour the batter evenly into the prepared pans. Bake in preheated oven until lightly browned and a toothpick comes out mostly clean, around 30 minutes or so (it took less time for me because I forgot to use the lower temperature). Remove from oven and allow the cakes to cool in the pans for 15-20 minutes before transferring to cooling racks. Make sure the cakes are completely cooled before frosting (you can place them in the freezer, wrapped in plastic wrap, for 10-15 minutes to speed up the cooling process).
To make the Frosting:
1) Put a pan with about an of inch of water onto the stove and heat until simmering.
2) In the bowl of a stand mixer, combine the egg whites and sugar. Place over the simmering water and cook, whisking constantly, until the mixture reaches 160F (71C), or until the egg whites are hot and the sugar is dissolved.
3) Place the mixer bowl onto the base of the mixer. Using the whisk attachment, beat the mixture until very stiff, glossy peaks form (it took about 10 minutes for me). The bowl should be cooled off at this point.
4) With the mixer on low, add the little butter pieces one at a time, mixing a bit before adding another piece. At this point the frosting may look curdled, but don't freak out. Keep mixing and it will become smooth.
5) Mix in the lemon extract.
To assemble the cake:
1) Place a bit of frosting onto your cake stand or a plate. Put the first layer of cake down. Pipe a ring of frosting around the edge. Fill the ring with half of the lemon curd. Place another layer of cake on top and repeat the filling process. Put the last cake on top, bottom side up. Put the whole cake into the freezer for about 10-15 minutes.
2) Crumb coat your cake, filling in any gaps between the layers, and put a good layer of frosting on top of cake. Scrape away some of the frosting from the side of the cake to make a pretty "naked" cake. Or you can use up the rest of frosting by piping on rosettes, or whatever you wish.
3) Top with mint leaves and pansies. Serve. Store any leftovers in the refrigerator.

Example of piped rosettes on the side of the cake.


